3 craft projects to help you heal your heart and reinvent yourself (really!)
Author and blogger Maya Pagán Donenfeld's new book takes a step beyond the adult coloring book craze—with craft projects to help you reinvent yourself.


Going a step beyond the adult coloring books that suddenly became ubiquitous this year, the new book Hope Make Heal: 20 Crafts to Mend the Heart takes a hands-on approach to self-improvement.

Maya Pagán Donenfeld, whose previous book was simply called Reinvention and who runs the inspirational maya*made blog, set about assembling a collection of easy craft projects that let readers use physical skills to mend their hearts, or grow their wings, or change their course.
The tangible results signify the qualities we’re looking for on a healing path: strength, calm, release, and hope.
Not only that, the results are pretty! You end up with soothing objects you’ll be happy to have in your home long after your work (physical and spiritual) is done.
Here are three projects to foster a spirit of reinvention—note that the first step of each is to sit in stillness, listening and feeling where you are in the moment to help bring awareness and focus to your transformation. (And perhaps make contact with your inner Girl Scout!) —Ann Abel
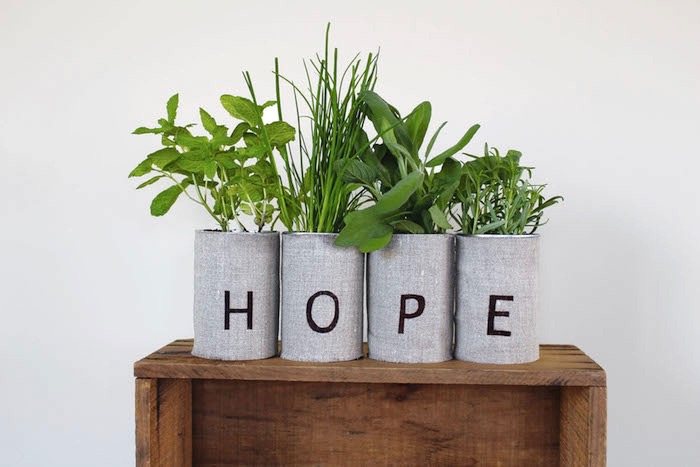 Growing Hope
Planting a seed and watching it grow celebrates possibility and promise. You don’t need a plot of land or even a backyard—a few cans sitting in a windowsill can provide many of the healing benefits of gardening. Add the unexpected element of a special word printed on the pots and you can cultivate anything: from “hope” to “trust.”
HEART PROMPTConsider the simplest needs of a plant—healthy soil, light and water. What are your basic needs? What else might you require to thrive that you don’t receive or insist upon? Are there steps you might take to ensure that your growth is supported?
MATERIALS• 4 clean empty soup cans (labels removed)• Measuring tape• Scissors• Scraps of linen, cotton, or burlap in a neutral color• Needle and thread or sewing machine• Freezer paper• Pencil• Craft knife and mat or old cookie sheet• Iron and ironing board• Textile paint• Foam brush• Potting soil• Seeds (see planting suggestions)• Water spray bottle• Damp rag
MAKE1. First make a slipcover for each can: Measure the height of the can, then measure the length around the body of the can (the circumference) and add 3⁄4 inch to this latter measurement. Cut four pieces of fabric with these measurements (for example, if your can were 5 inches high and 10 inches around, you would cut the pieces 5 inches high by 10 3⁄4 inches wide).
2. Fold each fabric rectangle in half width-wise, with the right sides touching. Sew a straight seam down the length side using a 1⁄2-inch seam allowance. Turn right side out and try on the slipcover. Pull a few threads from the top of the fabric to create a frayed edge.
3. Remove the slipcovers and flatten each with the seam centered in the back.
4. Select a four-letter word, such as hope, to be spelled by your cans. Prepare letter stencils by printing from a computer the letters of your word in your favorite font, or creating your own. Make sure each letter is approximately 1 1⁄2 inches tall.
5. Place the freezer paper shiny side down over the letters and trace them on the matte side of the paper. Make sure to leave lots of space around each letter, since they will be placed individually on each can. Use scissors to cut around each letter, allowing a minimum of 2 inches of paper on all sides of the letters. You will have four letters total, each centered on its own piece of paper. Carefully cut out each letter with a craft knife on a mat or an old cookie sheet.
6. Iron the letter stencils, shiny side down, onto the front center of each slipcover. Take care to place each letter at the same height from the bottom so that the word is positioned evenly when completed.
7. Apply textile paint to the paper stencil with the foam brush, then brush the paint from the paper onto the fabric—sweeping the color from the outside edges to the center of the letter. Allow the paint to dry. Pull off the paper and heat set each letter by flipping the slipcover over so the letter is face down and ironing the fabric briefly on high heat.
8. Fill each can with soil to about 1 inch from the top. Sprinkle seeds densely and evenly over the surface. Cover with a dusting of additional soil. Spray on just enough water to moisten the top of the soil. Clean up the outside of the can with a damp rag.
9. Slide the covers on and arrange the cans in a spot that gets a nice amount of light, such as a windowsill or a sunny shelf. Water the seeds regularly to keep the soil moist but not soggy. Misting the soil’s surface while the seeds germinate is helpful. Watch your garden grow!
PLANTING SUGGESTIONS• Wheat seeds grow quickly and look fresh and vital. You can give your wheatgrass a “haircut” when it gets really long.• Aromatic plants like lavender look beautiful and smell divine.• Plant a tea garden and include different kinds of mint and chamomile.• Make a mini–kitchen garden with culinary herbs and eat the words you grow.
(Reprinted by arrangement with Roost Books, an imprint of Shambhala Publications, Inc., Boulder, CO.)
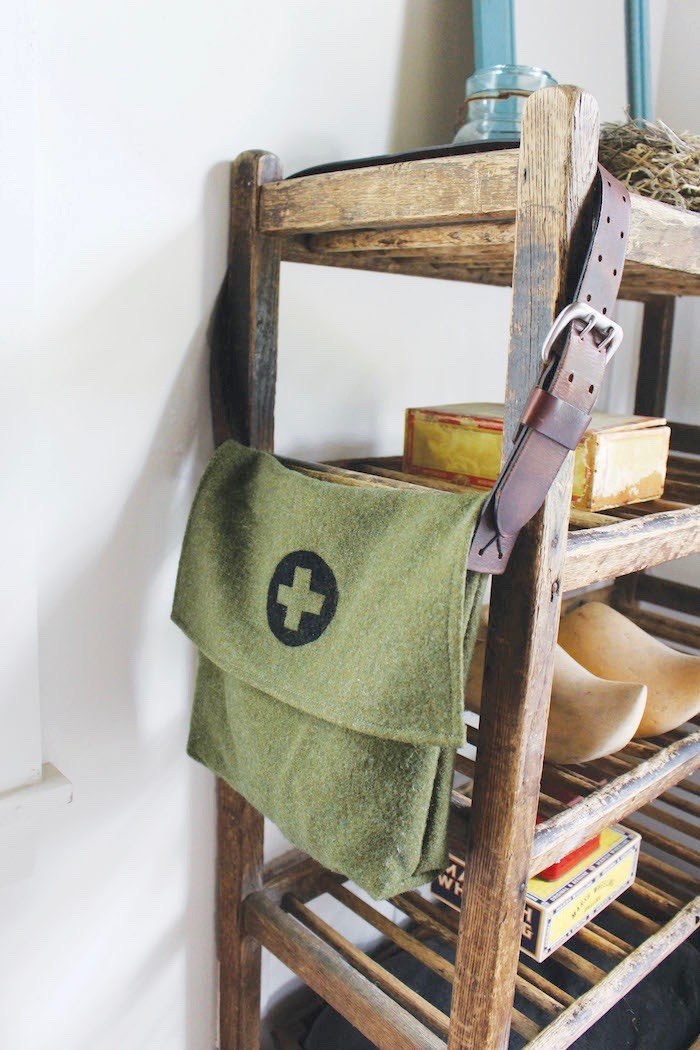 Survival Satchel
Being prepared for any of life’s little mishaps is one response to the reality that we have very little control during challenging times. This carryall can be your everyday bag loaded with daily provisions; it’s an ode to Clara Barton, the caregiver who founded the Red Cross. She carried a very similar satchel into battle or in the aftermath of natural disasters. She filled it with all of the comforts and necessities one might need—from bandages to jars of jam.
HEART PROMPTConsider what you might include in an emotional-survival tool kit. These items don’t all have to fit in your satchel, nor do they have to be tangible and accessible. Create your wish list of supplies and be sure to include at least one item for each of your senses.
MATERIALS• Wool army-blanket section measuring 13 x 32 inches• Scissors• Pins• Needle and button thread or sewing machine• Iron and ironing board• Leather belt• Leather punch• Pencil• Freezer paper• Craft knife and mat• Foam brush• Textile paint• Fabric scrap
MAKE1. If you haven’t already, cut the blanket to the dimensions specified. There is no right side or wrong side for a wool blanket. Fold one of the 32-inch sides up by 12 inches to make the body of the bag. Pin the folded fabric in place. Cut a 1-inch square out of the bottom right and left corners at the fold.
2. Using a 1⁄2-inch seam allowance, sew straight down each side of the bag, from the top edge of the folded-up fabric to the top edge of the cut-out square. The top of each seam will receive a lot of stress from opening and closing the bag, so add a few extra stitches there for added strength.
3. Create the boxed corner by opening the square at the bottom so that the bag bottom and side meet along the 2-inch cut edge. Stitch this edge closed with another straight seam 1⁄2-inch from the edge. Repeat on the other side.
4. Turn the bag inside out. Fold the excess fabric over to create a front flap. You can skip to adding the strap at this point or finish the flap by hemming it. Either way works, since wool edges won’t fray very much and can be left raw.
5. To hem the flap, press each side under by 1⁄2 inch. Finally, fold over the bottom of the flap 1⁄2 inch and press with an iron. Sew the folded hems in place just like the other sides.
6. Add the strap. You will be using the entire belt, including the buckle. Buckle the belt and slice it at least 5 inches below the buckle side. Use a leather hole puncher to create four holes in a square formation near end of the strap. (The bag shown uses a belt with a double row of holes throughout, which eliminates the need for this step.) Using a needle and button thread, attach each end of the strap directly centered over the side seams about 1 1⁄2 inches from the top. Create a stitched X by stitching back and forth diagonally through each hole.
7. Add a stencil to the flap if desired: Trace a drinking glass on the matte side of a 6-inch-square sheet of freezer paper. Cut out the entire circle, resulting in a square of freezer paper with a circle cut out of the center of it, and iron it shiny side down to the center of the flap. Cut out a shape or symbol of your choosing from another piece of freezer paper. Center it in the circular frame and iron it shiny side down. Using a foam brush, apply textile paint over the stencil in light layers. Allow the paint to dry, and then peel off the paper. Place a piece of fabric over the stencil and iron it on high heat to set the paint.
8. Fill your bag and know that whatever comes your way, you’re that much more prepared.
(Reprinted by arrangement with Roost Books, an imprint of Shambhala Publications, Inc., Boulder, CO.)
 Affirmation BannerA string of feathers is an eye-catching way to pay tribute to the work you are doing. This banner honors your self-worth.
MATERIALS• Sharpies• Feather templates, photocopied, cut out, and painted• Clear tape• Button thread
MAKEWith a Sharpie, write an affirmation on each feather, or write a letter on each feather to spell out one powerful affirmation. Tape each end of a long piece of thread to the wall. Tape the feathers to the thread, being sure to space them evenly. Leave your bunting on the wall or hang it in front of a window or over a doorway.
(Reprinted by arrangement with Roost Books, an imprint of Shambhala Publications, Inc., Boulder, CO.)
Looking for more ways to reset for 2016? Check out the “non-resolutions” from Lena Dunham and friends.
Sign Up for Our Daily Newsletter
Get all the latest in wellness, trends, food, fitness, beauty, and more delivered right to your inbox.
Got it, you've been added to our email list.


