Is this the hardest pose in yoga?
Wanderlust's national director of yoga, Schuyler Grant, breaks down the biggest mistakes people make when attempting chaturanga and shows how to do it safely.
Yoga poses generally fall into one of two camps: the ones that feel straight-up awesome (looking at you, happy baby), and those that make you want to skip straight to savasana.
For a lot of yogis, chaturanga dandasana is at the top of the second list. First of all, the pose—essentially a plank with elbows bent to a 90-degree angle—requires a ton of strength in muscles we don’t often use. And then there’s the fact that it’s usually performed over and over again during the average Western yoga class, leading to lightning-fast burnout.
“So many of us lack upper body strength—and in chaturanga, we’re repetitively bearing at least half of our body weight on our arms,” explains Schuyler Grant. As the national director of yoga at Wanderlust, she’s currently leading a free 21-day challenge that breaks down the essentials of 60 different poses, chaturanga included. “Even if you’re on the stronger side, you may not have the balanced muscles you need in your back body to support the pose properly.”
The pose—essentially a plank with elbows bent to a 90-degree angle—requires a ton of strength in muscles we don’t often use.
If that’s the case, Grant says, a few things tend to happen: The shoulders roll forward, compressing the front of the rotator cuffs; the lower back sags, causing even more compression; and the elbows splay out to the sides, putting pressure on the wrists. Over time, this can lead to tendonitis (or worse) in the shoulder and wrist joints.
There are, however, steps you can take to set yourself up for a stronger and safer chaturanga—one that will eventually result in killer posture and a toned upper back and shoulders. Follow these cues and the pose might even make its way onto your feel-good list.
Keep reading for Grant’s tips on the right way to perform chaturanga dandasana.
1. Get really good at plank first
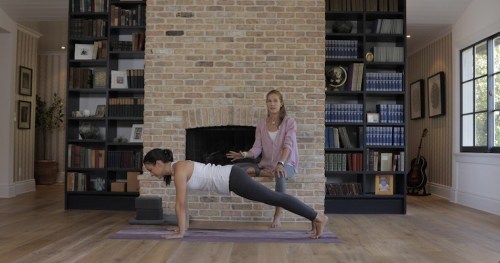
Grant’s rule of thumb: if you can’t hold a static plank pose for at least a minute with perfect alignment, you’re probably not ready to safely attempt chaturanga.
Why? “Ultimately you want your chaturanga to feel light and easeful,” says Grant. “But that only comes with balancing your muscles in such a refined way that you really distribute the weight out of the muscles that tend to overwork and into the rest of your body: legs, core, back body. “
The best way to learn how to do this is to perfect your plank. “You can be in a vinyasa class and hold plank while everyone else is doing chaturanga,” Grant offers. “Then, without letting your shoulders hunch, slowly lower your hips down [and bend your elbows slightly] to take cobra.”
Grant says there are a few things you should keep in mind while planking:
• Focus on engaging your legs and core to keep your belly from hanging down towards the floor.
• Point your hands forward, line your wrist creases up with the front edge of your mat, and ground down through the inner edges of your hand.
• Externally rotate your upper arm bones so you feel your shoulder blades press into your back.

2. Work on chaturanga from the ground up
Once a minute-long plank pose feels like a breeze, you’re ready to start practicing chaturanga.
Here’s Grant’s favorite way to teach the pose to beginners:
• Start out by lying on your belly, hands in line with your outer ribs and wrist creases parallel to front edge of mat.
• Keep your hands shoulder-width or slightly wider as you point your elbows straight back.
• Hug your shoulder blades to your back and open your chest.
• Then, press into your hands to lift your head, neck, and shoulders as high as your elbows or slightly above. “Your head and shoulders should never be lower than your elbows,” Grant says. “That’s higher away from the floor than anyone thinks.”
• From here, tuck your toes and use your legs and core to lift your pelvis off the floor, being careful not to let the belly droop.
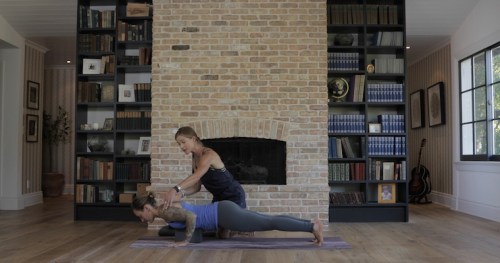
“Do that a thousand times,” says Grant—only half-jokingly—until you become familiar with where your shoulders should be in space. “Then, start from plank and try to lower and find that same position. Your body will know where to go.” (You can use a block to help you find the sweet spot, as illustrated above).
3. Modify when needed
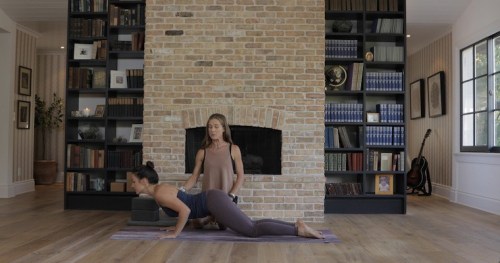
While you’re building your strength, Grant recommends taking chaturanga from your knees frequently in yoga class. This will help shift some of the weight out of your upper body.
Keep her cues in mind:
• From plank, drop your knees down so your body’s in a straight, diagonal line from your knees to the crown of your head.
• Lengthen your tailbone, lift your belly, and engage your core.
• Bend your elbows straight back.
• Stop once your head, neck, and shoulders are in line with your elbows or slightly above.
And there’s no need to do every chaturanga in class if you’re tired, Grant stresses. “It’s way better to slow down and skip some chaturangas than to keep powering through with hunched shoulders,” she says. “Anybody who’s feeling enthusiastic about their yoga practice should be feeling enthusiastic about the long term.”
The “gallop” is the chaturanga of HIIT workouts—in other words, one of the hardest moves you’ll ever try. Here’s how to get your gallop on, plus tips on mastering the equally brutal box jump and pull-up.
Sign Up for Our Daily Newsletter
Get all the latest in wellness, trends, food, fitness, beauty, and more delivered right to your inbox.
Got it, you've been added to our email list.
