This often-forgotten step is the key to making your Dutch braids look Pinterest perfect
Use this often-overlooked trick to add volume to your Dutch braids, just like the Instagram influencers do.

I learned how to French braid in middle school, on a two-hour bus ride to a youth dance competition. When we arrived, a dozen perfectly plaited tweens filed off the school bus, in matching track suits and false eyelashes, like a parade of dolled-up Stepford children. (Creepy, I know, but that’s #dancelife.)
But even though my French braiding skills have improved in the, uhhh, decades since then—I can knock out a pair of pigtails in five minutes—the results have tended to look much more Ronda Rousey in the ring than ethereal woodland nymph in a clearing. Until recently.
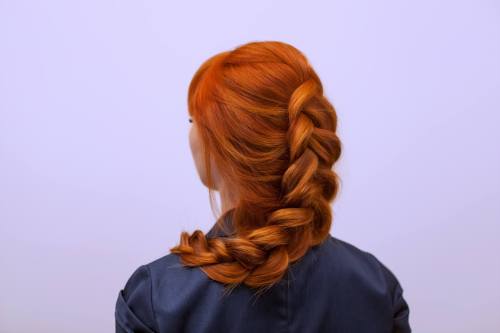
The one thing my braids were missing, I came to learn after watching an embarrassing amount of YouTube tutorials, was volume. The women whose braid pics have been Pinned a gazillion times don’t actually have flowing unicorn manes of hair (they can’t all be so follically blessed, right??). Instead, they know how to fake it by adding this one final step to their braids: After finishing the braid, they tug on the criss-crossing sections of hair in order to make them larger. And this technique is like the sisterhood of the traveling plaits. While I have fine, wavy hair, I’ve seen it work on a wide range of hair textures and lengths.
The women whose braid pics have been Pinned a gazillion times don’t actually have flowing unicorn manes of hair. Instead, they know how to fake it
First, this tip for achieving that wispy, I-just-woke-up-like-this look really only works with Dutch braids—what I called “inside-out braids” until about five minutes ago. To achieve these, just like with French braids, you start with a small section of hair, divided into three, and begin braiding, alternating sides and adding hair as you go. To flip the braid inside out, you just cross the sections of hair under the plait you’re creating rather than over. Then the sections pop right out for you to see.
Now, how exactly do you pump up the volume? I’ve always found it’s easier to keep the braid neat (AKA free from unwanted bumps and lumps) by braiding tightly. When I try to create a loose plait in order to avoid that school-girl-at-a-horse-jumping-competition vibe, things always fall apart fast. So go ahead and make your tight braid, but when you’re tying off the elastic, leave some room at the bottom rather than plaiting until the very tips of your hair. Then, pull the hair-tie down an inch or two, allowing yourself room to go back through and loosen up the braid. Using your fingers or a bobby pin, gently pull at the loops. And voila!
Because you’re starting with a tight braid, you can also easily rock the locked-and-loaded version of the ‘do for your morning sweat sesh, then just wriggle out the loose pieces to easily transition your look for the rest of the day. (Bonus: You get to skip the dreaded shower line…)
Because it’s much easier to understand when you see it done, here are some tutorials. (The volumizing starts at the 1:50 and 4:35 marks, respectively).
Happy braiding, you gorgeous Grecian goddess!
For you, is it vive la France or bust? Here’s how to get that effortlessly cool French-girl hair. And even though you’re faking it ’til you make it, these are the supplements to take for fuller, thicker hair.
Sign Up for Our Daily Newsletter
Get all the latest in wellness, trends, food, fitness, beauty, and more delivered right to your inbox.
Got it, you've been added to our email list.


