Why the Underrated Recumbent Bike May Be the Best Cardio Machine for Beginners
Learn why a physical therapist argues that the recumbent bike may be the best cardio machine for many beginners.

You’re headed to the gym, ready to get into shape (or even better shape!). But looking across the floor at all the different types of machines, hope turns into confusion: Where should I start? Should I use the elliptical? The stair climber? Get on the treadmill or the bike?
Experts in This Article
exercise physiologist with specialties in sports performance and injury risk reduction
physical therapist and therapeutic pain specialist
Well, there’s no one right answer. It depends on your level of fitness, previous injuries, and which piece of equipment you actually like enough to, you know, stick with it for more than a few minutes.
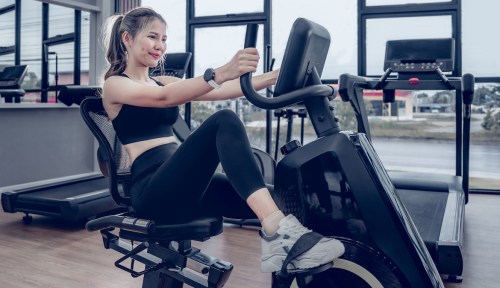
Still, I’d like to make an argument for one that’s often overlooked: the recumbent bicycle, also known as the seated bicycle. I understand it may not be the sexiest piece of equipment, but, as a physical therapist, I can tell you that it offers a low-risk bridge back into fitness.
“Whether it’s someone coming in for their first day after a long hiatus or a professional athlete, you can build a fitness and habit baseline by using the recumbent bike for cardiovascular fitness,” says trainer Alan Hseih, whose experience and clientele spans from the United States to East Asia, across the full spectrum of demographics.
The ergonomic design with the seat lower to the ground and in a reclined position makes it easier on the body and relatively comfortable compared to other cardio machines. “Not only are [recumbent bikes] effective in rehabilitation settings—for example to build strength and restore range of motion following hip or knee injuries—but also for someone who has some injury history they’re concerned about, or simply for someone who hasn’t trained in a long time and wants to build up their fitness levels,” says physical therapist Dustin Willis, DPT.
Speaking of fitness levels, research has shown that the recumbent bike can provide multiple benefits. From a strength perspective, it’s been found to increase strength in multiple muscles including the glutes, hamstrings, calves, and shin muscles. Mobility-wise, seated cycling is particularly beneficial for maintaining knee bending, hip bending, and ankle mobility in both directions. The recumbent bike also shows good cardiovascular benefits, comparable to upright cycling. Last but certainly not least, there are studies that indicate recumbent biking puts less strain on the front of the knee—particularly of note for any gym-goers with knee problems.
How to get started on the recumbent bike
So now that I’ve thoroughly hyped up this low risk/high reward machine, here are some key recommendations on how to best use it.
Set up the bike seat correctly
To find the proper position for the bike seat, put one foot on the pedal and push it away as far as it goes. Your knee should have just a slight bend in it; make sure the knee isn’t locked out—this can put extra pressure into the knee joint.
If you have no issues after a handful of sessions then you’ve found your optimal position. However, if you do have some ongoing discomfort, then try a position with slightly more knee bend. Every body is different so you have to find what works for yours.
A recumbent bike workout plan
Week 1: For the first week, ride for 20 minutes at a low resistance setting. Your exertion level should be around a three or four out of 10 (where 10 equates to maximal effort). Do this three times during the week. The goal is simply to get you used to the bike.
Week 2: If you’re not having any discomfort after the first week, increase the time to 25 minutes for the second week. If you are having discomfort, stick with 20 minutes at a time until you’re able to tolerate the movement well.
Week 3: Similar concept to week two: As long as you don’t have any discomfort, increase the workout another five minutes to 30 minutes.
Weeks 4 and 5: Now that we’re at 30 minutes, the goal is to keep the time there but start increasing intensity. Up the resistance until your exertion level is a five or six out of 10.
Week 6 and beyond: Once you’re six weeks in, we have some more options to progress because your body and mind have adapted well. You can implement high intensity interval training with the recumbent bike or you can mix up your workouts with more challenging machines. If you choose the former, here’s a simple yet effective interval plan:
- 5 minute warmup at an exertion level of two out of 10
- 1 minute interval at seven out of 10 exertion, followed by 1 minute of recovery at three out of 10 exertion. Repeat 10 times.
- 5 minute cooldown at an exertion level of two out of 10
Sign Up for Our Daily Newsletter
Get all the latest in wellness, trends, food, fitness, beauty, and more delivered right to your inbox.
Got it, you've been added to our email list.


