advertisement
These 3 Summer Recipes Take Advantage of the Season’s Best Flavors
These summer flavors are the perfect star ingredients for a fresh, seasonal spread. Get three delicious recipes featuring each flavor.

While summer may be known for all the activities it brings—beach hangs, chilling by the pool, long outdoor walks—the food possibilities are not to be overlooked (okay, they should never be overlooked in any season—just wanted to make sure you were paying attention).
While the usual suspects like corn on the cob, cherries, and all the tomato and burrata are certainly nourishing go-to’s for a reason, if you’re hoping to add a few recipes to your warm-weather spreads, you’re in the right place.
We teamed up with ADM to spotlight five fresh summer flavors that, if they aren’t already a staple for you, add major tastebud appeal to your seasonal cooking—and took things one step further by creating three delicious recipes to try. Mouthwatering reaction guaranteed.
Keep scrolling for three seasonal recipes that showcase five delicious summer flavors.

Now is the time to get creative with your usual salsa recipe. Cape gooseberries (a South American nightshade that’s said to taste like a cherry tomato with a hint of pineapple or mango) add a welcomed bit of sweetness and tartness, while serrano peppers (the spicy fave originally from Mexico) provide a Goldilocks-level of heat.
The result is a chip dip that tastes super complex, but is super easy to make. Have leftover Cape gooseberries? They make a great sweet-tart sauce for desserts, while serrano peppers give summery margaritas a nice kick.
Ingredients6 ounces Cape gooseberries, sliced in half1 pint cherry tomatoes, husks and stems removed, sliced in half¼ cup chopped cilantro, stems and leaves1 garlic clove, finely diced1–2 tsp serrano chile peppers, finely diced2 Tbsp olive oil1 Tbsp lime juice, fresh¼ tsp sea salt3–5 cranks of freshly ground pepper
- 1.Add all the ingredients to a medium bowl, mix, and let sit in the fridge at least one hour before serving. Store in the fridge for up to three days.
Notes:
If you’d like a smoother salsa, pulse the ingredients in a food processor.

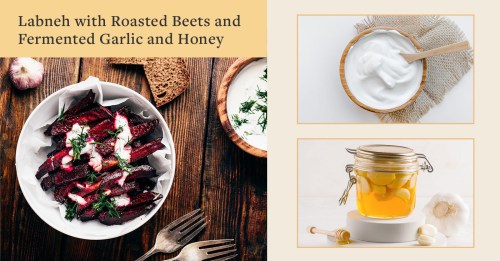
Before your eyes widen at the many steps in this recipe, know this: The seemingly complicated dish is actually three simple-ish dishes combined into a summer showstopper.
Homemade fermented garlic and honey is a delicious complement to so many foods (avo’ toast, fish…), and labneh is a Middle Eastern sauce that’s basically a cross between yogurt and cream cheese. Serving both with roasted beets results in a truly rich, impressive main.
Ingredients
For the fermented garlic and honey:2 heads of organic garlic, about 1 cup1 cup raw honey, plus more to cover the garlic cloves
- 1.A few days before you want to enjoy the dish, make the fermented garlic and honey. Peel the garlic and cut the root off (that’s the small rough spot at the base).
- 2.Add the cloves to a jar, add the honey** on top to cover, and place a lid on top.
- 3.Check and open the lid every day to let out the gases and to shake it upside down and coat the garlic. You can eat this at any point in the fermentation process.***
- 4.Store for up to one year in a cool, dark place (under 90° F and not in the fridge). The best place is a cabinet that you check regularly.
For the labneh:2 cups of thick strained yogurt, like Greek
- 1.Also a day or two in advance, make the labneh. Place the yogurt in cheesecloth, put in a strainer, and if possible, add a small saucer on top to press the yogurt down. Let it sit over a bowl or container for 24 to 48 hours, depending on the texture you want to achieve. Store the labneh in the fridge and use it within three days.
For the roasted beets:8 small to medium beets, any color works1 tsp sea salt2 Tbsp olive oil, divided¼ tsp za’atar¼ cup labneh1 Tbsp fermented garlic honey⅛ tsp flaky sea salt2–3 cranks of freshly ground pepperSalad or pita bread to serve
- 1.Finally, make the roasted beets. Preheat the oven to 400° F, and cut the tops and bottoms off the beets.
- 2.Put the beets in a roasting pan lined with parchment paper, and fill the pan with enough water to cover the bottom of the beets.
- 3.Drizzle with olive oil and sprinkle with salt. Bake for about an hour until the beets are tender and you can easily pierce them with a knife.
- 4.Let the beets cool, and then peel them and cut into fourths. Serve with a dollop of labneh, a drizzle of the fermented garlic honey, za’atar, sea salt, pepper, and the garnishes of your choice.
Notes:
*Soaking garlic cloves in a bowl of warm water for 30 minutes to one hour makes them easier to peel.
**If honey has crystallized, place the honey container in warm water until it’s liquid again.
***The pH should be less than 4.6—you can buy pH test strips—if it gets above that, add a splash of apple cider vinegar.

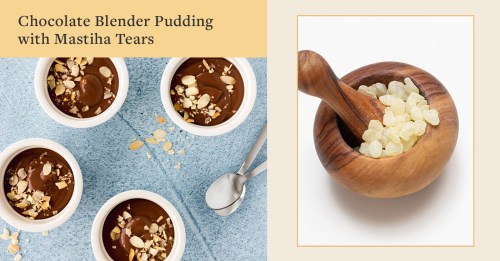
If you’ve never made your own chocolate pudding before, now’s the time to try it with this fancy-tasting-yet-easy-to-make version. Infusing the pudding with sweet and earthy mastiha—a tree resin from Chios, Greece that hardens into granules in the shape of “tears”—adds a special something to the chocolatey dessert. If you’re left with additional mastiha, it also doubles as a great rub for grilling!
Ingredients
½ cup full fat coconut milk1 tsp vanilla extract2 tsp mastiha tears½ cup water¼ cup brewed coffee2 eggs10 oz. dark chocolate chips⅛ tsp sea salt, divided
- 1.Blend the coconut milk, vanilla, and half the sea salt on low for 30 seconds. Place in a medium metal or ceramic bowl with the tears.* Let this sit aside for 60 minutes or overnight.
- 2.Place the eggs, chocolate, and remaining sea salt in the blender.
- 3.In a saucepan over medium heat, add the water and coffee. Simmer for three to five minutes until it boils and slowly pour over the chocolate and eggs in the blender on low. Be careful—this is hot! Blend for about one minute on low and then slowly increase to high speed for one minute. It should be well blended.
- 4.Strain the coconut milk and mastiha mixture through a fine sieve, and discard the mastiha. Add the coconut milk slowly to the blender on low. Blend for about 30 seconds on low and then slowly increase to high speed for another 30 seconds.
- 5.Pour into small glasses or bowls and let chill in the fridge for at least two hours or pour into popsicle molds and let sit for four hours or overnight. Enjoy!
Notes:
*Mastiha tears are very sticky. Do not heat them or place them in the blender or food processor, it will break the machine.
Recipes: Carla Contreras
Top photo: Getty Images/Solskin; Graphics: Well+Good Creative
Sign Up for Our Daily Newsletter
Get all the latest in wellness, trends, food, fitness, beauty, and more delivered right to your inbox.
Got it, you've been added to our email list.


