How to decompress your spine using a foam roller, according to a Pilates pro
A fitness expert explains the foam roller spine decompression exercises that help combat sitting at a desk all day. Here's what to know.
I always associate my foam roller with pain (sure, that pain often brings wonderful and much-needed muscle tension relief, but still). The recovery tool doesn’t have to be your frenemy, though—it can also be used in therapeutic, gentle ways. One star example of this? Using your foam roller for spinal decompression.
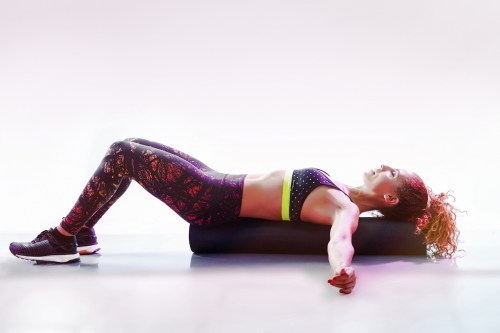
At New York’s Dynamic Body Pilates studio, founder and Pilates pro Rebecca Lubart had me lie down on top of a foam roller, with it lined up right underneath my spine from my skull to my tailbone. It may not sound like much, but all of my back tightness felt like it immediately dissolved away. “One of the best things you can do is lie down on a foam roller,” says Lubart. “In the simplest terms, it’s the combination of switching your orientation to gravity while still having to maintain a basic level of balance.” In this position, your under-used spinal stabilizers—like the multifidus and transverse abdominals—get activated, she explains, which help to strengthen your back overall (something that helps you maintain a good posture).
“By the end of the day, we can feel stress and pressure from our day [in our backs],” says Lubart. “Even a brief, five-minute session of lying down on a foam roller can leave you feeling relieved and refreshed.” Keep scrolling for the exercises she recommends doing on the foam roller (grab a full-length one) for added mobility and spinal relief.
The foam roller exercises to decompress your spine
1. Breathing: It sounds too good to be true, but “you can benefit from just lying down on a foam roller and breathing,” says Lubart. Make sure the roller is underneath your butt and your head with your knees bent, feet on the floor. “Gravity will help the roller disarm your overworked back muscles all up and down the spine.” To deepen your breathing, Lubart recommends directing the air into your belly, like you would in a yoga class.
2. Cactus stretch: Goal post your arms to open up your chest. “Reach your arms out to the sides, keeping your elbows bent at a 90-degree angle,” says Lubart. “Your goal is to get your fingernails to touch the floor. Breathe in and on the exhale try to release the breastbone and front ribs down toward each other.” Hold each goal post for three full breath cycles. Deepen it by raising your arms from goal post position to straight up, or in a “Y” shape. “Try to keep touching the floor as you slide your arms long, then slide back into goal post.”
3. Knee folds: “Fire up a little more of your musculature for even better relief of those achey spots,” says Lubart, who recommends using your core to lift one leg into table top (knee above the hip), then release and shift to the other leg while maintaining balance. “Make it your goal to not shift off-center on the roller as you lift each leg,” she says. “Keep everything but your breath and moving leg totally still.”
4. Arm circles: “Bring your arms around you like you’re giving yourself a hug, then take them over your head like you’re taking off a sweatshirt,” says Lubart. Then circle your arms like a snow angel down besides your hips. Cross your arms over your body again and repeat about five times before reversing the circle. “Let your upper back fall into the roller,” she says.
Also good for your back are twisting yoga poses that decompress your spine. And here’s how to massage back pain on your own.
Sign Up for Our Daily Newsletter
Get all the latest in wellness, trends, food, fitness, beauty, and more delivered right to your inbox.
Got it, you've been added to our email list.
