Our editors independently select these products. Making a purchase through our links may earn Well+Good a commission
Want Perfectly-Baked Homemade Bread That Requires Zero Effort? Use Your Instant Pot
Curious how to make a basic no-knead bread recipe using your instant pot? Find the best instant pot bread recipe here.

Finding an ideal warm spot in your kitchen for proofing dough can become a challenge during the colder months. Finding sufficient time to knead and proof bread dough, however, is next to impossible year-round. (The only exception: a pandemic-prompted lockdown.)
When patience runs thin, you’re just too hangry, or you simply don’t have the painstakingly long hours required to properly proof your bread dough, your trusted Instant Pot can help save the day. Aside from its slow and pressure cooking capabilities—and its ability to make delicious hard-boiled eggs—this multi-function kitchen appliance is just the thing for proofing dough in less than half the time it would typically take to rise and double.

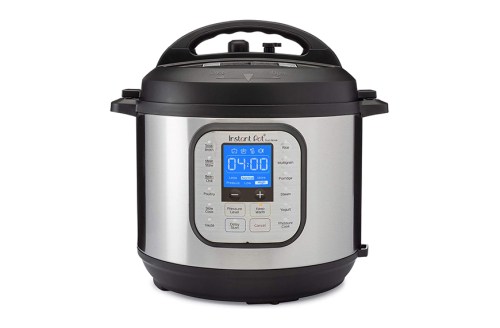
Instant Pot Duo — $89.00
Ready for luscious loaves of sourdough, crispy pizza crusts, and fluffy homemade cinnamon buns? Here to help you master the time-saving magic of Instant Pot bread, we’ve compiled tips, tricks, and a simple recipe to make bread-baking at home a breeze.
Why does using your Instant Pot to proof dough work so well?
Proofing refers to the activation of yeast, which leavens dough, and leavening is what helps your dough rise. This step is a form of fermentation in which yeast cells consume the carbohydrates and expel carbon dioxide gas that causes the dough to become deliciously fluffy, airy, and light. However, for this to occur, the dough must be kept at a controlled temperature—between 70°F to 90°F—to create the ideal environment for the yeast to expand. This is because exposure to fluctuating ambient temperatures cause the dough to expand too rapidly before the gluten structure can sufficiently develop.
Fortunately, using your Instant Pot’s ‘Yogurt’ setting can help you accomplish (and more importantly, speed up) this process. This is because the consistent warmth within the chamber of your Instant Pot ensures that your dough will proof at the ideal—and super stable—temperature for any set period of time.
A few helpful tips for this method of proofing bread dough
Add a splash of oil. To prevent the dough from sticking to the sides of the Instant Pot, make sure to add a tablespoon or so of oil to the pot before adding your dough. This grease layer will help to create a barrier as the dough begins to expand and rise.
Use parchment paper to avoid sticking. If you’re still concerned about sticking, adding a layer of parchment paper first and then greasing it with oil can also do the trick. This will also make removing the dough from the inside of the Instant Pot much easier.
Read the recipe first to see how many stages of proofing are needed. Depending on the recipe you’re following, the Instant Pot bread dough will need to rise once, twice, or more times than that. Typically, most dough recipes using yeast will require at least two rises that can take several hours each. However, by using your Instant Pot, you can cut down an overnight proofing session by more than half by dialing up the temperature. Generally, dough that would take two hours to proof at room temperature (about 75°F) would rise in only about one hour in an Instant Pot set at 90°F.
When proofing in two rounds, the first proof creates air pockets, as the dough expands to about twice its size. Then, once the dough has been shaped, the second proof yields smaller air pockets and a thicker crust to create a crunchy outside and soft interior once baked.
Check if your dough is ready to use. If your dough springs back up immediately when poked with a fingertip, it needs to rise for longer. However, if your dough dimples and slowly rises when poked, then it’s good to go.
No-knead Instant Pot bread recipe
Serves 4
Ingredients2 cups warm water (110-115°F)1 packet (2 1/4 teaspoons) instant active dry yeast1 teaspoon sugar4 1/2 cups all-purpose flour1 1/2 teaspoon kosher salt2 tablespoons olive oil1 tablespoon flaky sea salt
1. Combine the warm water, yeast, and sugar in a small bowl and stir. Allow the mixture to sit undisturbed for a few minutes. If the mixture doesn’t begin to bubble, you should restart with new yeast.
2. In a large bowl, combine the flour and salt, and form a well in the center. Slowly begin to add the yeast mixture into the middle. Using a wooden spoon, stir the dry and wet ingredients together to form a droopy-but-cohesive dough.
3. Line the inside of your Instant Pot with parchment paper and grease with the oil. Place the dough inside and proof on the Yogurt setting at 90°F for 2 hours, or until the dough has doubled in size.
4. Dust a flat working surface with flour and place the dough on top. Shape the dough into a tight, round ball. Return to the Instant Pot, and allow to proof for another 30 minutes at 90°F.
5. Meanwhile, preheat the oven to 450°F. Place a high-heat-proof dutch oven with the lid on into the oven while it preheats for about 30 minutes.
6. Carefully remove the hot dutch oven from the oven, and place the risen dough using the parchment paper into the pot. Using a sharp knife, score the top of the dough about 1/2 inch deep to allow the dough to expand and release steam as it bakes.
7. Sprinkle with flaky sea salt and bake the bread covered for 30 minutes, or until golden brown.
Oh hi! You look like someone who loves free workouts, discounts for cutting-edge wellness brands, and exclusive Well+Good content. Sign up for Well+, our online community of wellness insiders, and unlock your rewards instantly.
Sign up for the Well+Good SHOP Newsletter
Get exclusive deals on wellness, beauty, fitness, and food products that have been hand-picked by our editors.
Got it, you've been added to our email list.


