Our editors independently select these products. Making a purchase through our links may earn Well+Good a commission
I Used Lashify To Give Myself the World’s Easiest At-Home Lash Extensions, and I Haven’t Touched My Mascara in a Week
When I came across Lashify, an at-home lash extension line that prioritizes lash health, I knew I had to try it.

I’ve got short, curly lashes. I live for a good mascara, and love throwing on falsies for special occasions. But, because my lashes are so curly, it’s hard to put lash strips on without gluing my actual lashes to my lids. I’ve always wanted to try lash extensions, but know the harsh chemical can wreck your lashes and your ocular glands. So when I came across Lashify, an at-home lash extension line that prioritizes lash health, I knew I had to try it.
Experts in This Article
board-certified ophthalmologist and founder of twenty/twenty beauty
“We are here to make sure that we have zero damage to your natural lashes. We want them to be able to thrive and grow,” says Jillian Medicis, corporate liaison and pro educator for Lashify. “Because they’re designed to go onto the lash, we don’t want anything to be too heavy. Even our thickest, fullest lash should feel weightless, and you should never feel that. They’re pretty much undetectable.”
What makes Lashify different from traditional lash extensions
According to Diane Hilal-Campo, MD, a board-certified ophthalmologist in New Jersey, traditional lash extensions can cause serious damage, especially if they’re applied incorrectly. “The adhesives have formaldehyde that can damage the meibomian glands,” and these are the glands that keep your eyes moist, she says. “You’re only born with a certain number of them, and they’re very delicate.”
Plus, the adhesive can cause your lashes to break off. Medicis says this happens because the bonds used in the glue typically cure, or harden, when they hit air, freezing in place on your lash. “Then as that lash extension grows out, it’s going to fall off, and it could break off your natural lash,” she says. To prevent this, Lashify uses flexible bonds that are free of harsh chemicals.
“Our bonds are flexible. While you wear them, they’re going to move freely with the natural lash, and that’s going to cause zero lash damage,” says Medicis. “Sahara Lotti, our founder, wanted to make it so that the system was safe and could be used by everyone. A lot of times, people will go get lash extensions and they’ll have burning, watery, itchy, running eyes from the lash extensions. That won’t happen with our bonds. They’re free of cyanoacrylates and formaldehyde, and they’re also free of latex.”
This formulation is why you can apply the lashes yourself. Since regular lash extensions have so many harsh chemicals, Dr. Hilal-Campo says applying them yourself is a major no-no since the glues can get in your eyes and cause harm. The Lashify bonds don’t smell or burn and they’re tacky so they won’t run into your eyes.
Lashify bonders also include good-for-your-lash ingredients. “They have biotin and lavandula inside of them,” says Medicis. “Those are nutrients for the natural lash. A lot of times, people have these lash extensions, they come and start wearing Lashify, and they end up saying that they have longer healthier lashes because of wearing Lashify.”
And even though the bonds are gentler on your lashes, they’re still effective. “You can wear them for one day, you can wear them for up to 10 days—you can really wear them for as long as you’d like,” says Medicis.
What you need to get started
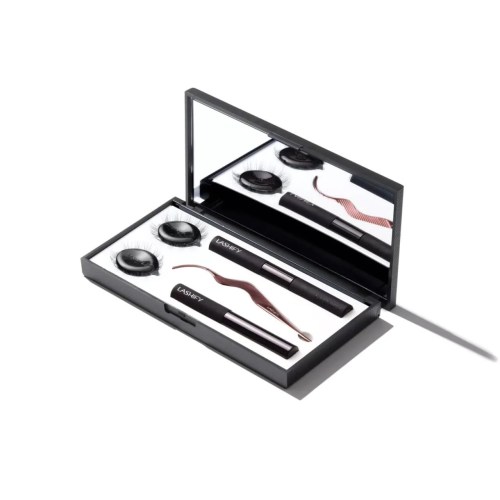
The best place to start is the Lashify Control Kit ($145), which offers a sort of “choose your own adventure” experience. You can pick the color of your case (fun!) as well as the style and length of your lashes.
Lashify Control Kit — $145.00
For lash style you choose from three collections: A for amplify (a natural lash with a soft curl), B for bold (which has a thicker fiber lash meant to give the appearance of mascara), and C for curl (the most natural, meant to look like bare lashes with a lash lift). There are two length options (10-12MM or 12-14MM), which come in all of the aforementioned styles.
Instead of full strips, Lashify’s lashes come in little clusters called “Gossamers.” To cover all of your lashes, you need about five or six of them. They have a super thin band that gets fused under your lashes, just above the lash line. “By applying to the underside, you get this really beautiful, seamless look on the top.”
Lashify offers a number of different bonding options, each of which has different levels of glue strength. But the stronger glues hold for longer, they tend to be more difficult to work with. The control kit comes with the brand’s Whisper Light Bond, which is the most beginner-friendly formula.
To make application as easy as possible, the kit comes with a wand that helps you put the lashes on and squeeze them into place. “Our wand is really cool because it is a patented hand tool, ergonomically designed to fit the curves of your face. It’s also going to cause zero damage to the natural lash as well,” says Medicis. “At the end, when you are fusing down or squeezing, that’s going to put a horizontal stamp force so a certain amount of pressure to the end, without damaging the natural lash.”
How to apply Lashify lashes
1. Clean your natural lashes
Wash your face and cleanse your lashes to make sure they’re free of any oils so that the glue can really adhere. The control kit comes with a sample of Lashify’s Pre-Cleanse Solution ($31), which is your best option for prepping your natural lashes. “A lot of times, people will try to use a micellar water to prep or even a witch hazel to prep,” says Medicis. “There’s hidden oils like glycerin or aloe in that sometimes. That’s going to cause that slippage, and you’re not going to get the wear that you want, or it makes the application hard.” To properly prep your lashes, simply put some of the pre-cleanse solution on a cotton pad and give them a thorough swipe.
2. Apply the first layer of glue
Next, you’ll go in with a layer of the Whisper Light Bond. It’s double-sided and comes with a black micro-mascara wand on one side and a clear brush on the other. For your first coat, use the micro-wand to apply the bond like a “thin, light coat of mascara” all over your lashes.
Let it sit for 30 seconds or so, until it gets tacky. You can speed this process up by using Lashify’s Blow Speed Dryer ($7). Either way, know that you can take your time. “With the Whisper Light, we’ve got quite a bit of a long drying time,” says Medicis. “Don’t ever feel like you need to rush to put them on.”
3. Apply layer two
Still using the micro-wand end of Whisper Light Bond, apply a second coat, this time focusing just on the base of your lashes. “What we’re doing is building a little cushion at the base where we’re going to have the Gossamers sit inside, which is going to help with that longevity,” says Medicis. Same as before, let this layer get tacky.
4. Finish with layer three
Now, it’s time to use the clear end of the Whisper Light Bond, which has a stiff foam brush similar to what you’d see on liquid eyeliner. “The clear goes on white and once it gets tacky, it dries down clear,” says Medicis. Apply it along the base of your lashes, about one or two millimeters away from the water line, which is where you’re going to apply the Gossamers (aka lash clusters). Be sure to keep this layer nice and thin.
5. Apply the Gossamers working from the inside out
Use your fingers to remove the Gossamer from the cartridge and place it on your palm. Pick it up with the wand, and place it on the glue line, starting near your inner corner with the shorter Gossamers and using progressively longer ones as you work your way out for a natural-looking finish.
“We apply them away from the waterline so you don’t feel them,” says Medicis. “We also apply them away from the waterline so the root of your natural lash can grow. Also, if it’s touching the water line, it’s going to be exposed to constant moisture. That moisture will start to break apart the bond. You won’t get that wear if you’re looking for seven-to-10-day wear.” Let the lashes dry for a few seconds so they’re not slippery.
6. Fuse the lashes
Once all of the Gossamers are applied, you’ll use your wand to fuse (aka press) them together. There are two different ways to do this: With a ‘full fuse,’ which will get all of the lashes at once, or a ‘spot fuse,’ which requires you to do them one at a time.
For the full fuse, hold the wand parallel to your lashes and bring the curved end (with the curve facing your eye) all along the base of your lashes so you can squeeze all of the spines at once. To spot fuse, hold the wand perpendicular to your lashes and fuse one Gossamer at a time. Either way, you want to squeeze the Gossamer into place for about 10 seconds. If the glue makes your lashes stick to the wand, just blink a few times to release them.
7. Top it off with the finishing coat
About 30 minutes after fusing your lashes, seal them with the Glass Finishing Coat. “This makes them water resistant,” says Medicis. “It’s like when you go get your car waxed, then it rains the next day, and the water beads off—that’s what Glass is for the lashes.” It will also remove any leftover stickiness.
The finishing coat also has a micro-wand, and “all you need to do is run it along the sides, back and forth once or twice” across your lashes, says Medicis. “You can brush it through. It’s got a really glossy finish though. Sometimes brushing it through, you lose that soft, whispy feel, especially with Cs or As. I always just keep it at the base because that’s where you want to protect the bond anyways.”
8. Keep the lashes dry for 24 hours
Once the lashes are on, avoid showering or washing your face for 24 hours. “Any moisture that gets in there will start to break apart the bond,” says Medicis.
Caring for and removing your lashes
Once you’re out of the initial 24-hour window, try your best to keep the lashes as dry as possible, especially when you’re first starting out and getting the bonding technique down.
“Try to avoid splashing water directly on them, or putting your face directly under the shower head,” says Medicis. “For me now, I’ve been wearing them for a while. I went to Tulum, I was in the ocean. I was in the humid air, whatever. They’ll last me. I know what bonding technique works for me. When you first start out, try to avoid getting wet. If they do get wet, no big deal. Let them dry completely before you start touching them.”
Wash your face with a washcloth to keep the water away from your lashes. And if you put on eye makeup, remove it with Pre-Cleanse or any other oil-free makeup remover. Also, be careful to keep your skin-care products away from your lashes.
“That doesn’t mean that you can’t wear your face creams, your moisturizers, your oils, your serums,” she says. “You can still wear all of those, just make sure you’re going around the eye and not touching the actual lash with them. I go to sleep looking like a glazed donut. I have no issues with that because I’m not letting them touch my Gossamer.”
Whenever you’re ready to remove your lashes, you just need to soak a cotton pad with the Melt-Away Remover ($21)—you’ll have a sample of this in your kit. Alternatively, you can use micellar water. Take the cotton pad and press it on your lashes for about 30 seconds. Then you should be able to remove the Gossamers and any excess glue with ease.
My experience using Lashify
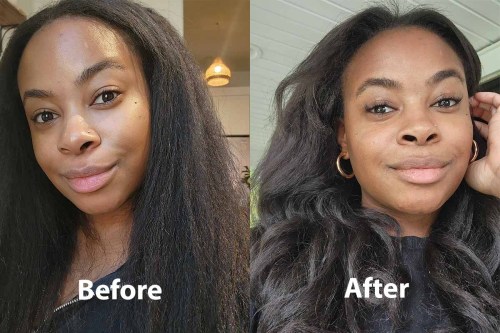
The first time I applied Lashify, it was a lot easier than I expected. Following the instructions above, I was able to get them on with ease. However, I didn’t pick the best day to apply them. I was headed to an event where I wanted to wear makeup, so after putting on my lashes I put on a full face of makeup. I broke the big rule and washed my face that night, doing my best to avoid my lashes. The next morning, half of the Gossamers were on my pillow.

My second time applying them I planned better and was able to get about seven days of wear out of them. I couldn’t feel them at all and they were totally comfortable to sleep in. A few Gossamers started to lift on day five, but I just added more bonds and spot-fused them in place. Once I hit day seven, I fully removed the lashes to start fresh. I didn’t see any breakage in my natural lashes, but I did notice a few full hairs come off. However, considering we lose about one to five eyelashes every day, I wasn’t really concerned.
I love everything about Lashify. For me, they’re easier to apply than strip lashes even though the process takes a bit longer. I also love how long they last. They aren’t something I want to wear all the time—I love dousing my face in water when I cleanse and smothering my lids in eye cream, and I can’t do either when the Gossamers are on. However, I’ll definitely be pulling them out for special occasions. For example, I’m going to a wedding in a few weeks and I’m so excited to have my Gossamers on all weekend.
The best part was knowing that I wasn’t harming my lashes. I’ve always loved the idea of lash extensions but was too scared that they’d ruin my already-short lashes. Knowing that Lashify uses flexible bonds that won’t break my lashes and actually have strengthening ingredients like biotin in them is super comforting. Whether you’re looking to try lash extensions for the first time or are rehabbing your lashes from damage caused by traditional extensions, Lashify is perfect for you.
Sign up for the Well+Good SHOP Newsletter
Get exclusive deals on wellness, beauty, fitness, and food products that have been hand-picked by our editors.
Got it, you've been added to our email list.
